Jump to the content of the page

videoXtens T-160 HP Transverse Strain Extensometer

The new standard for r-value measurement Download
Max. measurement range
  • 160 mm
Temperature range
  • Ambient temperature
Type of test
  • Transverse strain measurement
  • r-value determination
Material
  • Metals

Reliable r-values to ISO 10113:2020 with low scatter, easy handling and many extras

Here is what differentiates the videoXtens T-160 HP from the other optical transverse strain extensometers:

  • Measurement of change in width over the entire gauge length according to the recommendation of ISO 10113:2020.
  • Automatic axial gauge length detection through the use of offset sensor arms with multiXtens II HP / makroXtens II.
  • Uniform distribution of the 10 measurement axes over the entire gauge length. The outer measurement axes run through the measuring points of the gauge length.
  • Tracking of the 10 measurement axes during the test; no slipping of the specimen through the measurement axes.
  • Automatic detection of the break location and break classification to ISO 6892 or JIS Z2254.
  • Very high accuracy (class 0.5 to ISO 9513) through use of a camera and lens specifically selected for the test task.

The new standard for reliable r-values according to ISO 10113, ASTM E517, JIS Z2254

The r-value, or more accurately the vertical anisotropy, is one of the common characteristic values determined from tensile tests in accordance with ISO 10113, ASTM E517 and JIS Z2254. ZwickRoell developed the new videoXtens T-160 HP for this purpose. It measures over 10 measurement axes, equally distributed over the entire measurement range. With that, it not only delivers realistic r-values to ISO 10113, but also precise and highly accurate values.
Key advantages and features

Accuracy class 0.5 to ISO 9513
Individual evaluation of all ten measurement axes
Automatic detection and classification of the break location
Identification of error sources
Reliable r-values based on a minimum of 600 measuring lines
Right:

Accuracy class 0.5 to ISO 9513

  • With accuracy class 0.5 (ISO 9513) and 0.20 µm resolution, the width measurement is uniquely accurate.
  • The use of a camera with lens that is specifically set up for change in width measurement achieves more accurate and more reliable test results with low scatter.
  • The intelligent algorithm results in accurate measurement on the specimen edge, without the need for gauge marks.
  • The videoXtens T-160 HP is scaled on all 10 measurement axes, which ensures the reliability of the measured values.
  • The stable mounting of the videoXtens features low-vibration characteristics and protects against misalignment.
  • The images are processed in the software in real time.
  • Exact synchronization of all measurement channels.
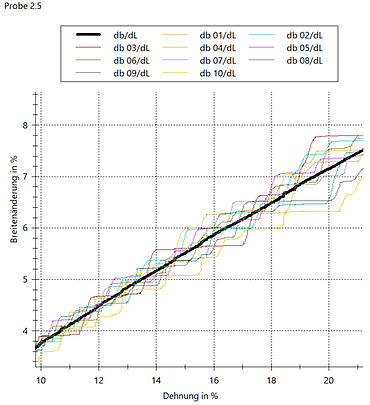
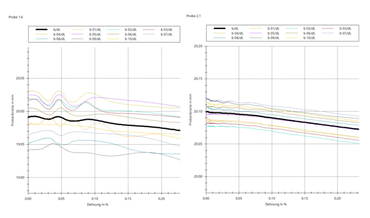
The PLC effect (Portevin-Le Chatelier effect) is visible through the display of the ten individual measurement axes

Individual evaluation of all ten measurement axes

  • The measured values of all 10 measurement axes can also be individually evaluated and displayed. This way it is possible to verify at any time whether values are plausible, and a Portevin-Le Chatelier effect as well as Lueders bands can be detected and visualized. In addition, valid r-values can be determined for materials that display these effects.
  • The specimen geometry can be verified in terms of parallelism and form tolerances through comparison of the values from the 10 measurement axes.
Break classification to ISO 6892

Automatic detection and classification of the break location

With the automatic break location detection, the break location is determined and the break is classified according to ISO 6892 or JIS Z2254. For this, the camera image is cloned and assigned to its own break location channel in testXpert III (this is already set up in the Standard Test Program). In this cloned image, the position of the smallest width is determined during the test, at the same time as the r-value measurement, and the subsequent break is recorded. This occurs over the entire parallel length of the specimen, and not just over the full gauge length.

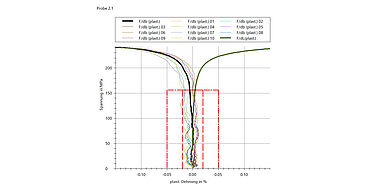
Layout for identification of error sources in the test arrangement and through artifacts in testXpert III

Identification of error sources

  • A separate layout with prepared curve graphs identifies sources of error in the test arrangement and artifacts (to ISO 10113 Annex A). Here each individual measurement axis is shown in addition to the mean value. The permissible deviation of the plastic extension of +/-0.05% is automatically monitored and displayed.
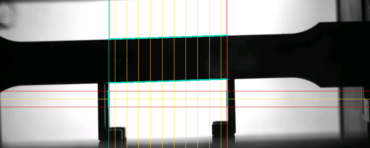
Ten equidistant measurement axes distributed over the entire axial gauge length

Reliable r-values based on a minimum of 600 measuring lines

  • The videoXtens T-160 ensures reliable, realistic r-values to ISO 10113:2020 with low scatter through evaluation of the entire gauge length with high accuracy and effectiveness.
  • The measurement of width reduction occurs on up to 10 measurement axes that are automatically and uniformly distributed over the entire gauge length.
  • The values of the measurement axes are based on a minimum of 600 measuring lines, which allows us to guarantee correct and precise r-values.

Do you have any questions regarding our products?

Please feel free to contact our product experts.
We look forward to discussing your needs.


Contact us

More on the r- and n-value calculation

Metals | Sheet metal | r-value
ISO 10113
to Metals | Sheet metal | r-value
Metals | Sheet metal | n-value
ISO 10275
to Metals | Sheet metal | n-value

Related products and accessories

Downloads

Name Type Size Download
  • Product information: videoXtens T-160 HP PDF 1 MB

Interesting customer projects

Top