DIN EN ISO 6892-2 Tensile Test on Metals – Test Method at Elevated Temperature
The purpose of the tensile test according to ISO 6892-2 is to stretch a heated specimen with a uniaxial tensile load to determine characteristic values for offset yield, tensile strength, strain at break, etc. The tensile test is performed at a temperature higher than 35°C.
The DIN EN ISO 6892-2:2018 standard describes tensile testing on metallic materials at elevated temperature.
Test task Characteristic values Test speed Temperature Strain measurement Specimen requirement The new standard Related products for high-tempeature tensile tests
The test task in detail
The test task is to reliably and reproducibly determine the characteristic values of the tensile test at elevated temperatures and achieve international comparability. Two methods regarding test speed are described in ISO 6892-2. The first, Method A, is based on strain rates with tight tolerances (±20 %), and the second, Method B is based on conventional strain rate ranges and tolerances. If strain-rate dependent characteristic values are to be determined, Method A is ideal for the minimization of speed-dependence and minimization of measurement uncertainty of the test results.
The speed influence on the mechanical properties, which are determined by means of the tensile test, is generally greater at elevated temperatures than at room temperature. ISO 6892-2 recommends the use of lower strain rates than at room temperature; however in the case of certain applications, i.e. for the comparison with the room temperature tensile test characteristic values at equal strain rate, additional higher strain rates are permitted.
During discussions regarding test speed in the preparation of ISO 6892-2 it was decided to consider removal of the stress velocity method for future versions of the standard.
The most important characteristics for tensile tests to ISO 6892-2
- Yield Point
- Offset yield
- Yield point extension
- Tensile Strength
- Strain at break
Test speed as the focus of the tensile test to DIN EN ISO 6892-2
DIN EN ISO 6892-2 is particularly focused on test speed. Previous versions of the standard permitted large strain rate ranges. The large speed ranges may cause a material that is sensitive to different test speeds to show significant deviations in characteristic values when subjected to other tests, even when tested according to standards.
To minimize the measurement uncertainty of the results that is caused by this variation in test speeds, the international organization for standardization ISO has adapted another method to the standard, in addition to the current method which is based on position and force control as well as in part on stress increase rate (Method B). This additional method allows for test speed control on the specimen itself (Method A). This happens with the measurement of the strain on the specimen itself and the introduction of this strain signal in a closed loop for control of the moving crosshead.
Selection of the test speed according to ISO 6892-2
Unless otherwise specified, the choice of method (A or B) and test speed shall be the responsibility of the manufacturer or of the test laboratory appointed by him, provided that the requirements of ISO 6892-2 are met.
The closed loop strain control is standardized for the first and most sensitive phase of the tensile test so that only two speed ranges are set to reliably detect Rp with significantly reduced tolerance: the strain rates 0.00007 per second or 0.00025 per second with tolerances of ± 20%,
where the first speed range is recommended by the standard, unless otherwise specified. For strain control in a closed loop, it is absolutely necessary to use an extensometer. To determine the tensile strength and strain at break of a material, a strain rate of 0.0014 per second is recommended, while using standard compliant position control (via the signal of the crosshead position).
Strictly speaking, two strain rates must be conceptually distinguished: first, the strain rate (closed loop, Method A1) with regard to extensometer gauge length (Le), and second the average strain rate over the test length (open loop, Method A2) with regard to the test length of the specimen (Lc). In the standard, the latter is also referred to as “estimated strain rate over the the parallel length”. In the case of strain control the strain rate is related to Le, therefore based on the strain signal; in the case of position control to Lc, therefore based on the crosshead position signal.
Temperature conditioning device and temperature control requirements to ISO 6892-2
In addition to test speed, temperature also has significant influence on the material characteristics. Therefore, DIN EN ISO 6892-2 is also dedicated in great detail to the temperature conditioning device and the temperature control.
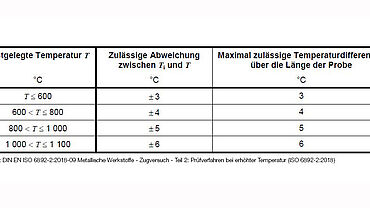
The temperature conditioning device used to heat the specimen must be such that the specimen can be heated to the set test temperature T. Furthermore, the temperature conditioning device must have appropriate openings for the temperature sensors and extensometer sensor arms. The permissible deviations between the set test temperature T and the indicated temperatures Ti, as well as the maximum permissible temperature differences over the length of the specimen are indicated the table above. Permissible deviations above 1,100°C are to be determined among the participating parties.

The temperature measuring system (all parts of the measurement chain) must have a resolution of at least 1°C and an error limit of ±0,004*T or ±2°C, where the higher value is taken into account. To perform the test according to standard, the temperature sensors must have good thermal contact with the surface of the specimen and be protected in a suitable manner against radiant heat from the wall of the temperature conditioning device.
The number of temperature sensors to be used depends on the size of the specimen. At initial gauge lengths under 50 mm the temperature is to be measured with one temperature sensor at each end of the test length. At longer initial gauge lengths an additional, third temperature sensor is to be used at the center of the specimen. However, the number of specimen thermocouples may be reduced provided that the overall arrangement of the temperature conditioning device and specimen (based on experience) is such that the temperature differences across the length of the specimen do not exceed the established permissible deviations. In any case, the temperature of the specimen is to be measured directly with at least one temperature sensor.
In addition, the ISO 6892-2 standard states that all parts of the temperature measuring system have to be checked over their entire operating range and be calibrated in a timespan of one year at the most. If the specimen was ultimately heated to the test temperature T, then a heating time of at least 10 minutes must be maintained prior to load application.
Strain measurement requirements to ISO 6892-2
ISO 6892-2 stipulates that the extensometer systems used to determine the offset yield in the relevant range must be a least Class 1 according to ISO 9513. The extensometer gauge length cannot be smaller than 10 mm and must be central to the test length. All parts of the extensometer that are outside of the temperature conditioning device (furnace, temperature chamber, and so on) must be designed or protected from air drafts, in such a way that room temperature fluctuations have minimal effects on the measured values. The standard gives no further information about permissible effects of room temperature fluctuations.
Since the tests are performed at elevated temperatures, in practice there are various possibilities of setting the initial gauge length, depending on whether the specimen’s heat expansion is taken into consideration during heating prior to the actual test start.
Specimen requirements to ISO 6892-2
Specimens must be prepared in such a way that the material properties are not influenced. All areas that were strain hardened through cutting or punching during specimen preparation must – if they affect the properties – be processed.
Products with a constant cross-section (profiles, bars, wires, and so on) and cast specimens
(e.g. cast iron, nonferrous alloys) can be tested without processing. The specimen cross-section can be circular, square, rectangular or ring shape, or in special cases can also have a different unique cross-section. Preferred specimens have a certain ratio of initial gauge length Lo to initial cross section So, which is expressed by the equation
Lo =k x √So, where k is a proportionality factor. The internationally accepted value for k is 5.65.
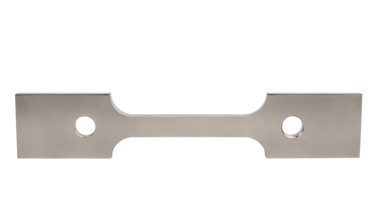
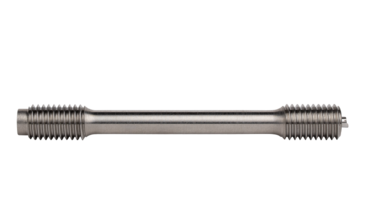
Typical specimen shapes for the tensile test to DIN EN ISO 6892-2 are:
- Flat specimens with locking pins
- Round specimens with threaded ends


The new DIN EN ISO 6892-2:2018 standard
- Establishes worldwide recognition that strain control with strain measurement on the specimen - using an extensometer - is the better control method.
- Paves the way to more stable and reliable determinations of strain limits and yield points.
- Improves the reproducibility of results between materials testing machines, among laboratories, between supplier and purchaser, and for collaboration between testing institutions and certifiers.
- Sets the tolerance limits for strain rates in all strain rate ranges to
±20 % (Method A).

Take advantage of the leading testing software in materials testing
ZwickRoell’s testXpert testing software offers:
- Simple operation: start testing right away and be a testXpert while maintaining maximum safety.
- Reliable and efficient testing: benefit from reliable test results and maximum testing efficiency.
- Flexible integration: testXpert is the optimal solution for all of your applications and processes—simply put, a more effective workflow.
- Future-proof design: testing software for the entire life cycle, ready for your future test tasks!
