ISO 178 | 3-Point Bend Test on Plastics
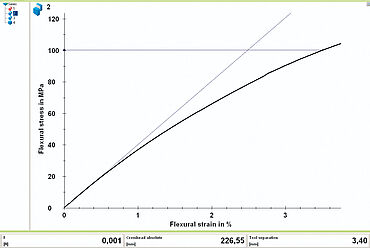
The 3-point bend test to ISO 178 is used for the determination of flexural properties of thermosets and thermoplastics. The most common results obtained with this test are the flexural modulus, which is calculated from the initial slope in the stress-strain curve, the flexural strength and the flexural strain at specimen failure. For ductile plastics, the flexural stress is usually determined at a defined deflection.
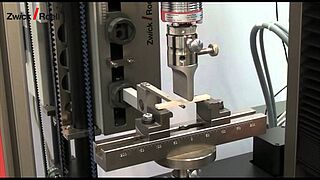
The test arrangement in the 3-point bend test according to ISO 178 consists of two parallel anvils or supports, and a centrally arranged loading edge, or upper anvil, between which a standard specimen is deformed within the scope of small bending angles. The bending forces and deflection are measured to determine the extreme fiber stress and strain of the specimen, from which the individual test results are calculated in the form of single-point data.
Another method for the characterization of flexural properties of plastics is described in the ASTM D790 standard.
Objective & characteristic values Running a test Specimen shapes and dimensions Test requirements Test equipment Automation options Request a consultationDownloads
Objective and characteristics of the 3-point bend test to ISO 178
The 3-point bend tests specified in ISO 178 and ASTM D790, describe classic standardized characterization methods for rigid and semi-rigid plastics. The flexural properties determined with these tests are of great importance to designers, engineers and manufacturers to ensure that the plastic material used meets the requirements for its intended application.
Typical test results include:
- Flexural modulus and flexural strength: The flexural modulus is a measure of the stiffness of the material and indicates how well it can resist flexural loads. Flexural strength provides information about the maximum load that the material can withstand in flexure before it breaks.
- Stress at 3.5% elongation
- Stresses and elongations at the yield point and at specimen break
Performing the 3-point bend test to ISO 178
- In the 3-point bend test, or 3-point flexure test, to ISO 178, a bar-shaped plastic specimen is placed between two supports.
- A force is then applied vertically to the top of the specimen midway between the supports.
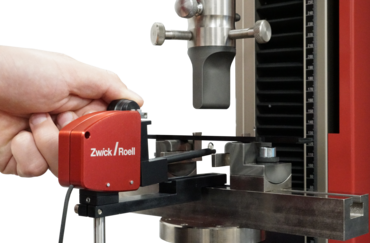
- The force and the deformation of the specimen are measured to determine the flexural modulus and the flexural strength. The flexural strain is measured with the makroXtens extensometer.
Specimen shape and dimensions to ISO 178
In accordance with ISO 178, the specimens for the 3-point bending test are taken from the middle part of the multipurpose specimen according to ISO 20753 for the molding material characterization. This ensures that the polymer is tested in the same processed condition as in the tensile test.
| Standard | Type | Note | l3 mm | l1 mm | b2 mm | b1 mm | h mm | L mm | Shape |
|---|---|---|---|---|---|---|---|---|---|
| ISO 20753 | A1 | Multipurpose specimen by injection molding | ≥150 | 80±2 | 20±0.2 | 10±0.2 | 4.0±0.2 | 115±1 | Dumbbell specimen |
| ISO 178 | - | Middle part of the multipurpose specimen | - | ≥80 | - | 10±0.2 | 4 (preferred) | - | Bar specimen |
Requirements for the 3-point bend test
- Calculating the flexural stress and strain typically takes into account small deflections and does not take into account any friction at the supports. For this reason, the standards limit this method to a flexural strain of 3.5%, which corresponds to a deflection of 6 mm for ISO specimens with a height of 4 mm. The calculation error accepted by the standards in this range still lies under 1% of the measured value.
- Exercising extreme care is a requirement when measuring specimen dimensions for a flexure test. Since specimen thickness is calculated quadratically in the flexural stress, the measurement error result is also a quadratic function. A measurement error of only 0.1 mm with a specimen height of 4.0 mm (nominal) produces an error in flexural stress of about 5%.
- The deflection measurement is carried out according to the particular objective of the testing laboratory. Depending on the objective and thus the complexity of the test, various types of deflection measurement are specified in ISO 178:
| Type of test | I | II | III | IV |
|---|---|---|---|---|
| Required objective of the test | Only stress / strength | Stress / strength / elongations greater than 1% | Stress / strength / elongations/ repeatable and precise module value | Stress / strength / elongations / correct and precise and therefore more accurate module value |
| Type of deflection measurement | No measurement required | Via crosshead travel | Via crosshead travel with compliance correction | Direct measurement via deflection measuring device |
- In the simplest case (Type I), only the maximum force or stress needs to be determined and no deflection measurement is required.
- If only deflection values are to be determined that result in an outer fiber strain greater than 1% (Type II), that is, the 3.5% flexural yield strength for example, then a simple measurement via the crosshead travel monitor of the testing machine is sufficient.
- Type III defined in the standard describes the case of a quality assurance or R&D task with flexural modulus measurement that only serves for internal comparison or tolerance monitoring purposes, and therefore, it is not so much the correctness but good repeatability of the measurement that matters. In this case, to simplify the test arrangement, the crosshead travel monitor of the testing machine and a compliance correction can be used.
- If the objective is to achieve accurate and correct test results according to Type IV, that also hold up in comparison with other testing laboratories, then use of a direct deflection measurement in accuracy class 1 to ISO 9513 is mandatory.

Simply and reliably start testing to ISO 178 with testXpert
With our testXpert testing software the operator onboarding process is quick and testing can start immediately. They only see tasks that apply to their specific responsibilities and are guided step-by-step through the test according to ISO 178.
- All characteristic values and settings defined in the ISO 178 standard are included in the standard test program with guaranteed standard compliance. The testing software guides the user through the test step by step.
- Users only see the steps they have to perform, which are established through the user management feature.
- Specimen dimensions to ISO 178 are transmitted directly to the testing software through the connection of the micrometer and digital caliper, saving time and eliminating errors.
- testXpert helps you achieve maximum testing efficiency. You can test up to 30% faster.
Maintain a quick, error-free overview
- Through standardized interfaces, test tasks are quickly read in from your ERP or QS system without errors and the results are transmitted back after the test. This saves time in the transmission process and prevents errors.
- Through centralized access to all test data via testXpert Analytics, an evaluation can be carried out on characteristic values from different test series. Also beyond ISO 178: Tensile modulus, flexural modulus, tensile strength, notched impact strength, flow rates and other characteristic values can be easily reproduced and evaluated.
- With our Trend Analysis feature, you have the ability to recognize longterm deviations with a simple longterm evaluation option.
3-point bend test for ISO 178
Along with its dimensional accuracy, a key feature of our sophisticated flexure test kit is accurate alignment. The supports must be precisely aligned with one another and with the die. In the stress-strain curve, angular errors can create a curve foot, which can significantly falsify determination of the modulus. Adjustable supports and well-designed gauges make this task significantly easier. Centering stops on the supports make it easy to position the specimen with precision.
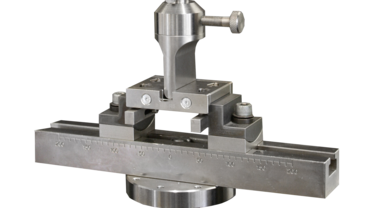
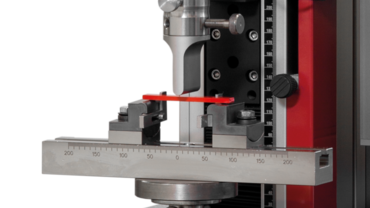
3-point flexure test kit with distance gauge to ISO 178:
- With the flexure test kit from ZwickRoell, tests can be performed up to maximum forces of 20 kN. The maximum deflection is 36 mm.
- When using the distance gauge to set the anvil span and the centering stops, the flexure test kit can be set in accordance with the standards when testing to ISO 178 and ASTM D790.
- According to ISO 178 for the 3 point bending test, the anvil spacing is 64 mm for anvil and die radii of 5 mm and an anvil width of 40 mm.
- The anvils can be aligned at a precise distance from each other and the support axis, and centered with the die.
- The centering stops of the flexure test kit can be conveniently adjusted and positioned using the distance gauge according to specimen widths of 10 mm (ISO 178) and 12.7 mm (ASTM D790).
ISO 178 – ZwickRoell solutions for deflection measurement
The results of the 3-point bend test to ISO 178 show the material behavior, in particular, near the surface of the specimen. The deflections measured are approximately four times greater than the extensions in a tensile test.
- With reference to the requirements for deflection measurement in accordance with test Type III, ZwickRoell testing machines can compensate for the deformation of the load frame, the load cell and the flexure test tool using our testXpert testing software. This enables sufficiently accurate measurement via the crosshead travel monitor of the testing machine. Operating the machine is therefore made simple, especially for quality control purposes.
- If a high degree of reproducibility is required, as is the case for test type IV to ISO 178, we recommend using an extensometer that facilitates load-free deflection under the specimen. ZwickRoell offers sensor arms for flexure tests that can be used with the automatic extensometers makroXtens or multiXtens, instead of tensile sensor arms.
Load frame for the 3-point bend test to ISO 178
To perform the 3-point bend test to ISO 178, you can use our universal testing machines zwickiLine, ProLine and AllroundLine.
Automated 3-point bend test to ISO 178
When it comes to large volumes of specimens in particular, these tests tie up a lot of personnel. A testing system for automated tests on plastics relieves qualified laboratory personnel of these routine tasks, This allows employees to take on more complex tasks, such as interpreting test results, evaluating new materials or participating in other research activities.
Our automated testing systems roboTest N, roboTest L and roboTest R are ideal for the automated performance of 3-point flexure tests according to ISO 178.
Comparison of our automated testing systems for plastics Request a consultation
