Heat Deflection Temperature According to ASTM D648 and ISO 75
Thermoplastics, in particular, increasingly lose their stiffness and hardness at higher temperatures. The heat deflection temperature (HDT) also referred to as heat distortion temperature describes the temperature at which a plastic material starts to deform under a predetermined load. This value is used in materials testing to evaluate the thermal resistance of a material. The HDT is measured by subjecting a defined specimen to an increasing temperature under constant load in a 3-point bending process until a defined deflection is reached.
The ASTM D648 and ISO 75 standards describe the test procedure and regulate the requirements for the test equipment and test conditions, such as load, specimen geometry and heating rate, in order to achieve internationally comparable results.
Another method for determining the thermal load resistance of plastics—in addition to relatively complex methods such as differential scanning calorimetry (DSC) or dynamic mechanical analysis (DMA)—is the Vicat softening temperature (VST) according to ISO 306 or ASTM D1525.
Objective & applications Standards overview Specimens Video Test sequence ISO vs. ASTM test conditionsHeat deflection testerDownloads Request a consultation FAQs
What is HDT used for and why is it important?
The heat deflection temperature is a purely comparative value that can be used for various purposes. In quality assurance, it helps to identify deviations in material quality during production. As a relative comparative value, it is essential for selecting plastics for applications with thermal loads, for example in the automotive, electrical or construction industries. It provides developers and engineers with information on whether a material can withstand the requirements of the end application without losing its dimensional stability. A high HDT value means that the material remains reliable even at high temperatures and loads. However, the results do not provide information about the maximum operating temperatures of the end product!
Heat deflection temperature - standards overview
ISO 75-1 describes the general test method for determining the heat deflection temperature under load. In all parts of ISO 75, only flatwise specimen arrangements are permitted for testing.
ISO 75-2 contains specific requirements for plastics (including filled plastics and long-fiber reinforced plastics where the fiber length is up to 7.5 mm before processing) and for ebonite. Three test methods are specified by different values of constant flexural stress at the beginning of the test:
- Method A: flexural stress = 1.80 MPa
- Method B: flexural stress = 0.45 MPa
- Method C: flexural stress = 8.00 MPa
The methods can be freely selected, however, it is recommended to choose a higher initial load the stiffer the specimens are. Based on the flexural stress applied, the results are significantly different. It is therefore important to indicate the stress condition along with the results. Measurements have shown that the HDT of a polypropylene specimen increases from 57 °C to 99 °C between Method A (1.8 MPa) and Method B (0.45 MPa).
ISO 75-3 contains specific requirements for the determination of the heat deflection temperature for highly resistant curable laminates and long-fiber reinforced plastics (where the fiber length is more than 7.5 mm before processing). The flexural stress is calculated using a fraction (1/1000) of the flexural modulus of the material when tested at room temperature.
ASTM D648 contains the standard test method for the heat deflection temperature of plastics under flexural load in the edgewise position of the specimen. Two test methods are determined based on the support span (separation of the lines of contact between specimen and supports):
- Method A: 101.6 ± 0.5 mm
- Method B: 100.0 ± 0.5 mm
Regardless of the method, constant flexural stress of 0.455 MPa or 1.82 MPa must be applied.
Specimens to ASTM D648 and ISO 75
For the material test, the specimens are normally processed through injection molding under specified conditions. This ensures high reproducibility of the results.
Mechanical preparation from components or plates, for example, for testing pipes or components in the automotive sector, is also permissible in accordance with both ISO 75 and ASTM D648. When preparing anisotropic specimens from plates, it is important to ensure that the specimens are machined in both the longitudinal and transverse direction to be able to detect direction-dependent differences in the results.
The requirements for the specimens according to ISO 75 and ASTM D648 are listed in the following table:
| Specimens: | ISO 75-1 and ISO 75-2 | ASTM D648 |
|---|---|---|
| Alignment | Flatwise position | Edgewise position |
| Injection-molded | Length: 80 ± 2.0 mm Width: 10 ± 0.2 mm Thickness: 4 ± 0.2 mm | Min. length: support span +12.7 mm Width: 3-13 mm Thickness: 12.7 ± 0.5 mm |
| From plates/components | Thickness: 3-13 mm; preferably 4-6 mm | Thickness: 3 mm or thicker |
| Quantity | At least two specimens* | At least two specimens |
*Specimens are aligned in pairs with opposite sides (onto which the load is applied) to the loading edge.
Video: Heat Deflection Temperature According to ISO 75 and ASTM D648
The video shows the test procedure for determining the heat deflection temperature according to ISO 75 and ASTM D648 as well as the Vicat softening temperature according to ISO 306 and ASTM D1525 using the Amsler Allround heat deflection tester and our testXpert testing software.
Test procedure and requirements according to ISO 75 and ASTM D648
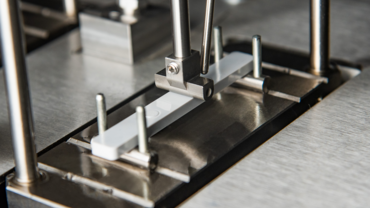
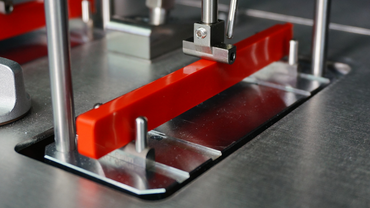
For the heat deflection temperature, the loss in stiffness is measured using a three-point flexure method. For this purpose, the specimen is applied to the supports in a flat (ISO 75) or upright (ASTM D648) position. The HDT loading edge can be mounted with the help of a centering tool. This ensures parallelism between the loading edge and the supports and prevents errors caused by faulty alignment.
The weight to be applied must be calculated according to the standards. This is done analogously in ISO 75 and ASTM D648 and is assumed by the testXpert testing software. The most important considerations here are the dimensions of the specimens, the support span and the stress to be applied—depending on the method selected.
After reaching the required starting temperature (ISO 75 >27 °C, ASTM D648 ambient temperature), the loading assembly is lowered into the heating bath (oil), the specimens are loaded with the weights and the test starts with a 5 minute waiting period. A waiting time of 5 minutes is provided to partially compensate for creep (which some materials exhibit when they are subjected to the specified flexural stress).
The initial creep distance is then recorded, the deflection meter is zeroed and the temperature is increased at a uniform heating rate of 120 ± 10 °C/h according to ISO 75 or 2 ± 0.2 °C/min (≙ 120 ± 12 °C/h) according to ASTM until the standard deflection is reached.
The result of the HDT test is the temperature at which a deflection of 0.25 mm (ASTM) or a flexural strain of 0.20% (ISO) is reached.
The following table contains a comparison of the most important parameters from ISO 75 (Parts 1 and 2) and ASTM D648.
Overview of test requirements for ASTM D648 vs. ISO 75
| ISO 75-1, ISO 75-2 | ASTM D648 | ||
|---|---|---|---|
| Test fixture | Support radius | 3 ± 0.2 mm | 3 ± 0.2 mm |
| Support span | 64 ± 1 mm | Method A: 101.6 ± 0.5 mm Method B: 100.0 ± 0.5 mm | |
| Flexural stress | Method A: 1.80 MPa Method B: 0.45 MPa Method C: 8.00 MPa | 1.82 MPa 0.455 MPa | |
| Temperature | Starting temperature | < 27 °C | Ambient temperature |
| Rate of temperature increase | 120 ± 10 °C/h 12 ± 1 °C/6 min | 2 ± 0.2 °C/min 10 ± 1 °C/5 min ≙120 ± 12 °C/h | |
| Thermometer position | No further than 12.5 mm from the center of the specimen | No further than 10 mm from the specimen, without touching it | |
| Result | Standard deflection | 0.20 % | 0.25 mm |
| Repeat | if the individual results deviate by more than 2 °C for amorphous plastics or ebonite or by more than 5 °C for semi-crystalline materials | – |
Heat deflection tester according to ISO 75 and ASTM D648
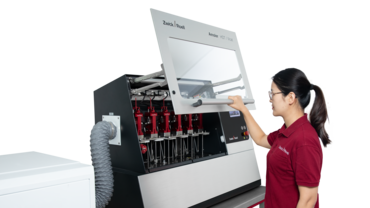
With the Amsler Allround 6-300 heat deflection tester, ZwickRoell offers a motorized instrument with a fully automated test sequence for determining Vicat and heat deflection temperatures up to 300 °C in accordance with all ASTM and ISO standards. Accurate and repeatable results are achieved through the use of advanced displacement measurement and temperature control technology. A user-friendly, safety-oriented and uncompromising design ensures comfort and safety. Either 2, 4 or 6 test stations with automated start of the cooling process, motorized lowering of the specimen and load application can be provided. The heat deflection tester can be operated in standalone mode with touch display or in connection with a PC. With the testXpert testing software, a meaningful analysis of the results can be realized.
More about the heat deflection tester More about the testXpert testing software
Frequently asked questions about the heat deflection temperature of plastics
The heat deflection temperature (HDT) also referred to as heat distortion temperature is a material property that describes the temperature at which a plastic material starts to undergo plastic deformation when subjected to a predetermined load. This property is primarily tested for thermoplastics and thermosets and is an important indicator of the thermal load capacity of a material.
ISO 75 describes the general test method for determining the heat deflection temperature of plastics and regulates the requirements for the test equipment and test conditions, such as load, specimen geometry and heating rate, in order to achieve internationally comparable results. The heat deflection temperature provides information on the temperature at which a plastic begins to deform under a specified load.
The heat deflection temperature according to ASTM D648 is a material parameter that describes the temperature at which a plastic begins to undergo plastic deformation under a defined mechanical load (constant bending stress of 1.82 MPa or 0.455 MPa) due to thermal influence (temperature increase at a uniform heating rate of 2°C / min in an oil bath). ASTM D648 specifies the test method for determining the HDT value. The HDT value is the temperature at a deflection of 0.25 mm.
The result diagrams often show irregular curves, as can be seen in the image. This phenomenon is completely normal and is due to the behavior of the plastic itself. The heat releases partially frozen internal stresses that can cause the specimen to move in or against the direction of the test. With the release of high residual stresses, a brief negative measurement displacement may even be recorded, which causes the irregular curves in the result. Such irregularities vary according to the material and its composition. However, they do not negatively influence the result, since these internal stresses are already relieved when the higher temperatures are reached. The thermal expansion of the specimens does not have a lot of significance. It does become more important, however, when wide specimens in edgewise position are used.
If you can rule out that the differences in results are due to specimen geometry or material, a common problem is the correct alignment of the HDT loading edge with the supports. Incorrect alignment of the loading edge can lead to big differences in the results due to transverse forces. These transverse forces do not occur if the loading edge is aligned correctly.
It is important to use carefully prepared specimens because irregularities can lead to incorrect results. For example, specimens that have a burr on the edges produce different results. This is especially the case for test methods that only use small forces and weights. Here, it could happen that the specimen rests on the burr and the overcoming of this irregularity is recorded as measured displacement during the test.


